
529 lines
24 KiB
Markdown
529 lines
24 KiB
Markdown
---
|
||
page-title: "Setting Up Amavis and ClamAV on Ubuntu Mail Server - LinuxBabe"
|
||
url: https://www.linuxbabe.com/mail-server/postfix-amavis-spamassassin-clamav-ubuntu
|
||
date: "2023-05-25 10:56:40"
|
||
---
|
||
This is part 11 in the Ubuntu mail server from scratch tutorial series. In this article, I will show you how to use **Amavis** and **ClamAV** to scan viruses in email messages.
|
||
|
||
**Amavis** (A Mail Virus Scanner) is a high-performance interface between a message transfer agent (MTA) such as **Postfix** and content filters. A content filter is a program that scans the headers and body of an email message, and usually takes some action based on what it finds. The most common examples are **ClamAV virus scanner** and **SpamAssassin**.
|
||
|
||

|
||
|
||
Amavis speaks standard SMTP protocol and can also use the Sendmail milter interface. It’s commonly used for
|
||
|
||
- virus-scanning by integrating with ClamAV (Clam AntiVirus)
|
||
- spam-checking by integrating with SpamAssassin
|
||
- DKIM signing and verification. (Actually, I prefer to use OpenDKIM for DKIM signing and verification.)
|
||
|
||
## Prerequisites
|
||
|
||
You should have completed at least [part 1 (Postfix SMTP server)](https://www.linuxbabe.com/mail-server/setup-basic-postfix-mail-sever-ubuntu) and [part 2 (Dovecot IMAP server)](https://www.linuxbabe.com/mail-server/secure-email-server-ubuntu-postfix-dovecot) of the Ubuntu mail server from scratch tutorial series. Note that if you used [iRedMail](https://www.linuxbabe.com/mail-server/ubuntu-20-04-iredmail-server-installation) or [Modoboa](https://www.linuxbabe.com/mail-server/email-server-ubuntu-18-04-modoboa) to set up your mail server, then Amavis and ClamAV are already installed and configured, so you don’t need to follow this tutorial.
|
||
|
||
**Warning**: Amavis and ClamAV require a fair amount of RAM. Make sure you have at least 1.3 GB free RAM on your server before installing Amavis and ClamAV. The whole mail server stack (Postfix, Dovecot, Amavis, ClamAV, SpamAssassin, OpenDKIM, MySQL/MariaDB, PostfixAdmin, and Roundcube Webmail) needs at least **3 GB** RAM to run smoothly. If your RAM runs out, you are going to have troubles like mail server going offline or unresponsive.
|
||
|
||
## Step 1: Install Amavis on Ubuntu
|
||
|
||
Amvis is available from the default Ubuntu repository, so run the following command to install it.
|
||
|
||
sudo apt install amavisd-new -y
|
||
|
||
Once installed, it automatically starts. You can check its status with:
|
||
|
||
systemctl status amavis
|
||
|
||
Output:
|
||
|
||
● amavis.service - LSB: Starts amavisd-new mailfilter
|
||
Loaded: loaded (/etc/init.d/amavis; generated)
|
||
Active: **active (running)** since Fri 2020-08-07 15:43:40 HKT; 1min 1s ago
|
||
Docs: man:systemd-sysv-generator(8)
|
||
Tasks: 3 (limit: 9451)
|
||
Memory: 75.4M
|
||
CGroup: /system.slice/amavis.service
|
||
├─1794260 /usr/sbin/amavisd-new (master)
|
||
├─1794263 /usr/sbin/amavisd-new (virgin child)
|
||
└─1794264 /usr/sbin/amavisd-new (virgin child)
|
||
|
||
If it’s not running, you can start it with:
|
||
|
||
sudo systemctl start amavis
|
||
|
||
Enable auto-start at boot time.
|
||
|
||
sudo systemctl enable amavis
|
||
|
||
By default, it listen on *127.0.0.1:10024*, as can be seen with:
|
||
|
||
sudo netstat -lnpt | grep amavis
|
||
|
||

|
||
|
||
And it runs as the `amavis` user. To check the version number, run
|
||
|
||
amavisd-new -V
|
||
|
||
Sample output:
|
||
|
||
amavisd-new-2.11.0 (20160426)
|
||
|
||
To check the logs of Amavis, you can run
|
||
|
||
sudo journalctl -eu amavis
|
||
|
||
Viruses are commonly spread as attachments to email messages. Install the following packages for Amavis to extract and scan archive files in email messages such as `.7z`, `.cab`, `.doc`, `.exe`, `.iso`, `.jar`, and `.rar` files.
|
||
|
||
sudo apt install arj bzip2 cabextract cpio rpm2cpio file gzip lhasa nomarch pax rar unrar p7zip-full unzip zip lrzip lzip liblz4-tool lzop unrar-free
|
||
|
||
If you use Ubuntu 18.04, then also install the `ripole` package.
|
||
|
||
sudo apt install ripole
|
||
|
||
Note that if your server doesn’t use a fully-qualified domain name (FQDN) as the hostname, Amavis might fail to start. And the OS hostname might change, so it’s recommended to set a valid hostname directly in the Amavis configuration file.
|
||
|
||
sudo nano /etc/amavis/conf.d/05-node\_id
|
||
|
||
Find the following line.
|
||
|
||
#$myhostname = "mail.example.com";
|
||
|
||
Remove the comment character (#) and change `mail.example.com` to your real hostname.
|
||
|
||
$myhostname = "mail.linuxbabe.com";
|
||
|
||
Save and close the file. Restart Amavis for the changes to take effect.
|
||
|
||
sudo systemctl restart amavis
|
||
|
||
## Step 2: Integrate Postfix SMTP Server With Amavis
|
||
|
||
Amavisd-new works as an SMTP proxy. Email is fed to it through SMTP, processed, and fed back to the MTA through a new SMTP connection.
|
||
|
||
Edit the Postfix main configuration file.
|
||
|
||
sudo nano /etc/postfix/main.cf
|
||
|
||
Add the following line at the end of the file. This tells Postfix to turn on content filtering by sending every incoming email message to Amavis, which listens on *127.0.0.1:10024*.
|
||
|
||
content\_filter = smtp-amavis:\[127.0.0.1\]:10024
|
||
|
||
Also, add the following line.
|
||
|
||
smtpd\_proxy\_options = speed\_adjust
|
||
|
||
This will delay Postfix connection to content filter until the entire email message has been received, which can prevent content filters from wasting time and resources for slow SMTP clients.
|
||
|
||
Save and close the file. Then edit the `master.cf` file.
|
||
|
||
sudo nano /etc/postfix/master.cf
|
||
|
||
Add the following lines at the end of the file. This instructs Postfix to use a special SMTP client component called `smtp-amavis` to deliver email messages to Amavis. Please allow at least one whitespace character (tab or spacebar) before each `-o`. In postfix configurations, a preceding whitespace character means that this line is continuation of the previous line.
|
||
|
||
smtp-amavis unix - - n - 2 smtp
|
||
-o syslog\_name=postfix/amavis
|
||
-o smtp\_data\_done\_timeout=1200
|
||
-o smtp\_send\_xforward\_command=yes
|
||
-o disable\_dns\_lookups=yes
|
||
-o max\_use=20
|
||
-o smtp\_tls\_security\_level=none
|
||
|
||
Then add the following lines at the end of the file. This tells Postfix to run an additional smtpd daemon listening on *127.0.0.1:10025* to receive email messages back from Amavis.
|
||
|
||
127.0.0.1:10025 inet n - n - - smtpd
|
||
-o syslog\_name=postfix/10025
|
||
-o content\_filter=
|
||
-o mynetworks\_style=host
|
||
-o mynetworks=127.0.0.0/8
|
||
-o local\_recipient\_maps=
|
||
-o relay\_recipient\_maps=
|
||
-o strict\_rfc821\_envelopes=yes
|
||
-o smtp\_tls\_security\_level=none
|
||
-o smtpd\_tls\_security\_level=none
|
||
-o smtpd\_restriction\_classes=
|
||
-o smtpd\_delay\_reject=no
|
||
-o smtpd\_client\_restrictions=permit\_mynetworks,reject
|
||
-o smtpd\_helo\_restrictions=
|
||
-o smtpd\_sender\_restrictions=
|
||
-o smtpd\_recipient\_restrictions=permit\_mynetworks,reject
|
||
-o smtpd\_end\_of\_data\_restrictions=
|
||
-o smtpd\_error\_sleep\_time=0
|
||
-o smtpd\_soft\_error\_limit=1001
|
||
-o smtpd\_hard\_error\_limit=1000
|
||
-o smtpd\_client\_connection\_count\_limit=0
|
||
-o smtpd\_client\_connection\_rate\_limit=0
|
||
-o receive\_override\_options=no\_header\_body\_checks,no\_unknown\_recipient\_checks,no\_address\_mappings
|
||
|
||
Save and close the file. Restart Postfix for the changes to take effect.
|
||
|
||
sudo systemctl restart postfix
|
||
|
||
## Step 3: Integrate Amavis with ClamAV
|
||
|
||
Now that Postfix can pass incoming emails to Amavis, we need to install the ClamAV virus scanner and integrate it with Amavis, so incoming emails can be scanned by ClamAV.
|
||
|
||
Install ClamAV on Ubuntu.
|
||
|
||
sudo apt install clamav clamav-daemon
|
||
|
||
There will be two systemd services installed by ClamAV:
|
||
|
||
- `clamav-daemon.service`: the Clam AntiVirus userspace daemon
|
||
- `clamav-freshclam.service`: the ClamAV virus database updater
|
||
|
||
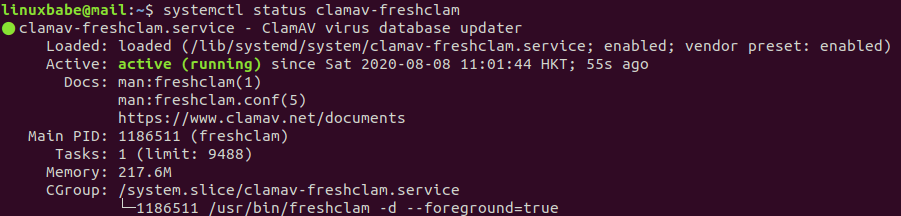
First, check the status of `clamav-freshclam.service`.
|
||
|
||
systemctl status clamav-freshclam
|
||
|
||
|
||
|
||
As you can see, it’s active (running) and uses 217.6M RAM on my mail server. Then check the journal/log.
|
||
|
||
sudo journalctl -eu clamav-freshclam
|
||
|
||
Output:
|
||
|
||

|
||
|
||
Hint: If the above command doesn’t quit immediately, press the Q key to make it quit.
|
||
|
||
We can see that `freshclam` downloaded 3 virus databases. CVD stands for ClamAV Virus Database.
|
||
|
||
- daily.cvd
|
||
- main.cvd
|
||
- bytecode.cvd
|
||
|
||
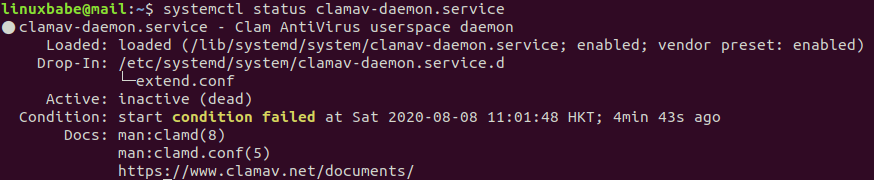
However, `clamd` was not notified because freshclam can’t connect to clamd through `/var/run/clamav/clamd.ctl`. Check the status of `clamav-daemon.service`.
|
||
|
||
systemctl status clamav-daemon
|
||
|
||
Output:
|
||
|
||
|
||
|
||
As you can see, it failed to start because a condition wasn’t met. In the `/lib/systemd/system/clamav-daemon.service` file, there are two conditions:
|
||
|
||
ConditionPathExistsGlob=/var/lib/clamav/main.{c\[vl\]d,inc}
|
||
ConditionPathExistsGlob=/var/lib/clamav/daily.{c\[vl\]d,inc}
|
||
|
||
The `clamav-daemon.service` failed to start because main.cvd and daily.cvd were not downloaded yet when it starts. So we just need to restart this service.
|
||
|
||
sudo systemctl restart clamav-daemon
|
||
|
||
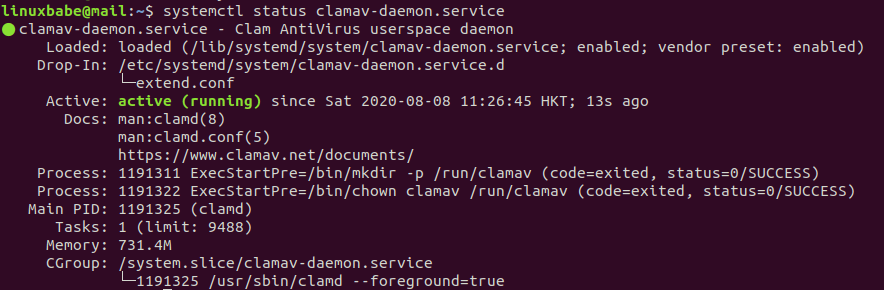
Now it should be running. By the way, it uses 731.4M RAM on my mail server. If your mail server doesn’t have enough RAM left, the service will fail.
|
||
|
||
systemctl status clamav-daemon.service
|
||
|
||
|
||
|
||
The `clamav-freshclam.service` will check ClamAV virus database updates once per hour.
|
||
|
||
Now we need to turn on virus-checking in Amavis.
|
||
|
||
sudo nano /etc/amavis/conf.d/15-content\_filter\_mode
|
||
|
||
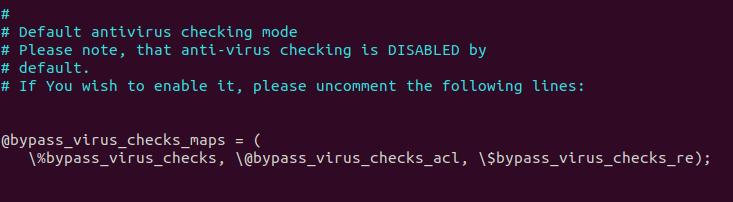
Uncomment the following lines to enable virus-checking.
|
||
|
||
#@bypass\_virus\_checks\_maps = (
|
||
# \\%bypass\_virus\_checks, \\@bypass\_virus\_checks\_acl, \\$bypass\_virus\_checks\_re);
|
||
|
||
|
||
|
||
Save and close the file. There are lots of antivirus scanners in the `/etc/amavis/conf.d/15-av_scanners` file. ClamAV is the default. Amavis will call ClamAV via the `/var/run/clamav/clamd.ctl` Unix socket. We need to add user `clamav` to the `amavis` group.
|
||
|
||
sudo adduser clamav amavis
|
||
|
||
Then restart Amavis and ClamAV daemon for the changes to take effect.
|
||
|
||
sudo systemctl restart amavis clamav-daemon
|
||
|
||
Check the logs.
|
||
|
||
sudo journalctl -eu amavis
|
||
|
||
You can see that Amavis is now using ClamAV to scan viruses.
|
||
|
||
Aug 08 17:26:19 mail.linuxbabe.com amavis\[1233432\]: Using primary internal av scanner code for ClamAV-clamd
|
||
Aug 08 17:26:19 mail.linuxbabe.com amavis\[1233432\]: Found secondary av scanner ClamAV-clamscan at /usr/bin/clamscan
|
||
|
||
Now if you send an email from other mail servers like Gmail to your own mail server and check the email headers, you can find a line like below, which indicates this email has been scanned by Amavis.
|
||
|
||
X-Virus-Scanned: Debian amavisd-new at linuxbabe.com
|
||
|
||
You should also check the mail log (`/var/log/mail.log`) to find if there are any errors.
|
||
|
||
## Step 4: Use A Dedicated Port for Email Submissions
|
||
|
||
ClamAV can scan both incoming and outgoing emails now. Amavis listens on port 10024 for both incoming and outgoing email messages. However, it’s a good practice to use a different port such as 10026 for email submissions from authenticated users. Edit the Amavis configuration file.
|
||
|
||
sudo nano /etc/amavis/conf.d/50-user
|
||
|
||
Custom settings should be added between the `use strict;` and `1;` line. By default, Amavis only listens on port 10024. Add the following line to make it also listen on port 10026.
|
||
|
||
$inet\_socket\_port = \[10024,10026\];
|
||
|
||
Then add the following line, which sets the “ORIGINATING” policy for port 10026.
|
||
|
||
$interface\_policy{'10026'} = 'ORIGINATING';
|
||
|
||
Next, add the following lines, which define the “ORIGINATING” policy.
|
||
|
||
$policy\_bank{'ORIGINATING'} = { # mail supposedly originating from our users
|
||
originating => 1, # declare that mail was submitted by our smtp client
|
||
allow\_disclaimers => 1, # enables disclaimer insertion if available
|
||
|
||
# notify administrator of locally originating malware
|
||
virus\_admin\_maps => \["virusalert\\@$mydomain"\],
|
||
spam\_admin\_maps => \["virusalert\\@$mydomain"\],
|
||
warnbadhsender => 1,
|
||
|
||
# force MTA conversion to 7-bit (e.g. before DKIM signing)
|
||
smtpd\_discard\_ehlo\_keywords => \['8BITMIME'\],
|
||
bypass\_banned\_checks\_maps => \[1\], # allow sending any file names and types
|
||
terminate\_dsn\_on\_notify\_success => 0, # don't remove NOTIFY=SUCCESS option
|
||
$undecipherable\_subject\_tag = '\*\*\*Encrypted Message\*\*\*',
|
||
};
|
||
|
||
Save and close the file. Restart Amavis.
|
||
|
||
sudo systemctl restart amavis
|
||
|
||
Check its status to see if the restart is successful.
|
||
|
||
systemctl status amavis
|
||
|
||
Next, edit the Postfix master configuration file.
|
||
|
||
sudo nano /etc/postfix/master.cf
|
||
|
||
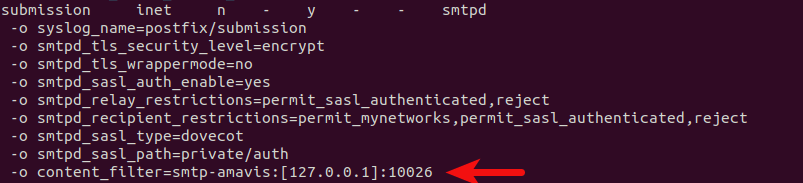
Add the following line to the `submission` service, so emails from authenticated SMTP clients will be passed to Amavis listening on port 10026. This line will override (`-o`) the `content_filter` parameter in `/etc/postfix/main.cf` file that we added in step 2.
|
||
|
||
-o content\_filter=smtp-amavis:\[127.0.0.1\]:10026
|
||
|
||
Like this:
|
||
|
||
|
||
|
||
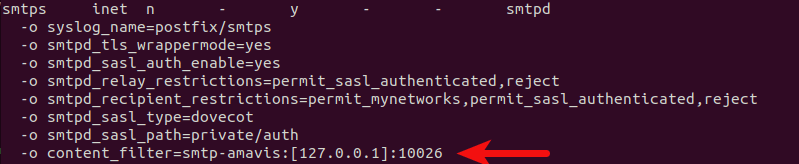
If you have enabled the `smtps` service for Microsoft Outlook users, then you also need to add this line to the `smtps` service.
|
||
|
||
|
||
|
||
Save and close the file. Restart Postfix for the changes to take effect.
|
||
|
||
sudo systemctl restart postfix
|
||
|
||
Check its status to see if the restart is successful.
|
||
|
||
systemctl status postfix
|
||
|
||
## Step 5: Receive Virus Alert
|
||
|
||
You need to create an email address `virusalert@your-domain.com` to receive virus alerts from ClamAV. Note that you should create a real email address instead of creating an alias. ClamAV will bypass Postfix and submit alert emails directly to Dovecot, which isn’t configured to query aliases in the PostfixAdmin database.
|
||
|
||
## Spam Filtering in Amavis
|
||
|
||
**Note**: If you have followed my [SpamAssassin tutorial](https://www.linuxbabe.com/mail-server/block-email-spam-check-header-body-with-postfix-spamassassin), you don’t need to enable spam-checking in Amavis. If you enable it, each email will be checked twice by SpamAssassin.
|
||
|
||
To enable spam-checking in Amavis, install SpamAssassin and related packages.
|
||
|
||
sudo apt install spamassassin libnet-dns-perl libmail-spf-perl pyzor razor
|
||
|
||
Edit an Amavis configuration file.
|
||
|
||
sudo nano /etc/amavis/conf.d/15-content\_filter\_mode
|
||
|
||
Uncomment the following lines to enable spam-checking.
|
||
|
||
#@bypass\_spam\_checks\_maps = (
|
||
# \\%bypass\_spam\_checks, \\@bypass\_spam\_checks\_acl, \\$bypass\_spam\_checks\_re);
|
||
|
||
Save and close the file. Then restart Amavis.
|
||
|
||
sudo systemctl restart amavis
|
||
|
||
## DKIM in Amavis
|
||
|
||
Two common pieces of software that can do DKIM signing and verification on Linux are OpenDKIM and Amavis. I prefer to use [OpenDKIM](https://www.linuxbabe.com/mail-server/setting-up-dkim-and-spf) because it works better with [OpenDMARC](https://www.linuxbabe.com/mail-server/opendmarc-postfix-ubuntu). So I won’t explain how to DKIM sign your email in Amavis.
|
||
|
||
By default, Amavis can verify the DKIM signature of incoming email messages. If you have OpenDKIM running on your mail server, then you can disable DKIM verification in Amavis.
|
||
|
||
sudo nano /etc/amavis/conf.d/21-ubuntu\_defaults
|
||
|
||
Find the following line and change `1` to `0`, so Amavis won’t verify DKIM signatures.
|
||
|
||
$enable\_dkim\_verification = 1;
|
||
|
||
Save and close the file. Then restart Amavis.
|
||
|
||
sudo systemctl restart amavis
|
||
|
||
When receiving incoming emails, Postfix will call OpenDKIM via the sendmail milter interface to verify DKIM signatures, then pass the email to Amavis for virus-checking. When sending outgoing emails, Postfix will call OpenDKIM to sign the emails, then pass them to Amavis for virus-checking.
|
||
|
||
## Improving Amavis Performance
|
||
|
||
By default, Amavis runs 2 processes. If you see the following lines in the mail log (`/var/log/mail.log`), it means Amavis can’t process emails fast enough.
|
||
|
||
postfix/qmgr\[1619188\]: warning: mail for \[127.0.0.1\]:10024 is using up 4001 of 4008 active queue entries
|
||
postfix/qmgr\[1619188\]: warning: you may need to reduce smtp-amavis connect and helo timeouts
|
||
postfix/qmgr\[1619188\]: warning: so that Postfix quickly skips unavailable hosts
|
||
postfix/qmgr\[1619188\]: warning: you may need to increase the main.cf minimal\_backoff\_time and maximal\_backoff\_time
|
||
postfix/qmgr\[1619188\]: warning: so that Postfix wastes less time on undeliverable mail
|
||
mail postfix/qmgr\[1619188\]: warning: you may need to increase the master.cf smtp-amavis process limit
|
||
mail postfix/qmgr\[1619188\]: warning: please avoid flushing the whole queue when you have
|
||
mail postfix/qmgr\[1619188\]: warning: lots of deferred mail, that is bad for performance
|
||
|
||
To improve performance, edit Amavis configuration file.
|
||
|
||
sudo nano /etc/amavis/conf.d/50-user
|
||
|
||
Add the following line in the file between the `use strict;` and `1;` line. This will make Amavis run 4 processes. If you have 10 CPU cores, you can change 4 to 10. Note that running more than 10 Amavis processes has little effect on performance.
|
||
|
||
$max\_servers = 4;
|
||
|
||
Save and close the file. Then edit the Postifx master configuration file.
|
||
|
||
sudo nano /etc/postfix/master.cf
|
||
|
||
Find the `smtp-amavis` service definition, and change the process limit from 2 to 4.
|
||
|
||
smtp-amavis unix - - n - **4** smtp
|
||
-o syslog\_name=postfix/amavis
|
||
-o smtp\_data\_done\_timeout=1200
|
||
-o smtp\_send\_xforward\_command=yes
|
||
-o disable\_dns\_lookups=yes
|
||
-o max\_use=20
|
||
-o smtp\_tls\_security\_level=none
|
||
|
||
Save and close the file. Then restart Amavis and Postfix for the changes to take effect.
|
||
|
||
sudo systemctl restart amavis postfix
|
||
|
||
Now run the following command. You should see that there are 4 Amavis processes now.
|
||
|
||
sudo amavisd-nanny
|
||
|
||

|
||
|
||
Press `Ctrl+C` to stop amavisd-nanny.
|
||
|
||
## Skip Virus-Checking for Your Newsletters
|
||
|
||
If you [use your mail server to send newsletters](https://www.linuxbabe.com/ubuntu/install-mautic-self-hosted-email-marketing-ubuntu-20-04), and you enable Amavis and ClamAV, then lots of CPU and RAM resources will be used for virus-checking when you send newsletters to your subscribers. It could make your mail server unresponsive. You can skip virus-checking for your newsletters by using the method below.
|
||
|
||
Edit the Postfix master configuration file.
|
||
|
||
sudo nano /etc/postfix/master.cf
|
||
|
||
Add the following lines at the beginning of this file. This will enable `smtpd` on port 2525 of the localhost and it can accept client connections initiated from the same server. If there’s another process listening on port 2525, you can change 127.0.0.1:2525 to something else, like 127.0.0.1:2552. Note that the `content_filter` parameter is set to `none`, which means emails won’t be scanned by ClamAV.
|
||
|
||
127.0.0.1:2525 inet n - - - 1 smtpd
|
||
-o syslog\_name=postfix/2525
|
||
-o postscreen\_greet\_action=ignore
|
||
-o content\_filter=
|
||
|
||
Then add the following lines at the end of this file. Replace 12.34.56.78 with the mail server’s public IP address. This will create another Postfix submission daemon listening on port 10587. This is for client connections from another server.
|
||
|
||
12.34.56.78:10587 inet n - y - - smtpd
|
||
-o syslog\_name=postfix/10587
|
||
-o smtpd\_tls\_security\_level=encrypt
|
||
-o smtpd\_tls\_wrappermode=no
|
||
-o smtpd\_sasl\_auth\_enable=yes
|
||
-o smtpd\_relay\_restrictions=permit\_sasl\_authenticated,reject
|
||
-o smtpd\_recipient\_restrictions=permit\_mynetworks,permit\_sasl\_authenticated,reject
|
||
-o smtpd\_sasl\_type=dovecot
|
||
-o smtpd\_sasl\_path=private/auth
|
||
-o content\_filter=
|
||
|
||
Save and close the file. Then Restart postfix.
|
||
|
||
sudo systemctl restart postfix
|
||
|
||
If your newsletter application runs on the mail server, then specify `127.0.0.1:2525` as the SMTP host, without SMTP authentication. If your newsletter application runs on a different server, then specify `12.34.56.78:10587` as the SMTP host, with SMTP authentication.
|
||
|
||
## Troubleshooting
|
||
|
||
If your Postfix SMTP server can’t send outgoing emails, and you find the following error message in the mail log (`/var/log/mail.log`),
|
||
|
||
relay=none, delay=239, delays=239/0.04/0/0, dsn=4.3.0, status=deferred (server unavailable or unable to receive mail)
|
||
|
||
it could be that amavis is not running, so you need to check its status:
|
||
|
||
sudo systemctl status amavis
|
||
|
||
You can restart it with:
|
||
|
||
sudo systemctl restart amavis
|
||
|
||
Another cause for this error is that you are enforcing TLS connection for Postfix when sending outgoing emails with the following setting in the `/etc/postfix/main.cf` file.
|
||
|
||
smtp\_tls\_security\_level = enforce
|
||
|
||
Since Postfix can’t establish TLS connection to Amavis, so the email is deferred. You should use the following setting.
|
||
|
||
smtp\_tls\_security\_level = may
|
||
|
||
Then restart Postfix.
|
||
|
||
## Using ClamAV to Scan Virus for the Linux File System
|
||
|
||
While the main topic of this article is virus scanning for emails, since ClamAV is installed on the server, why not use it to scan viruses for other files?
|
||
|
||
First, edit the ClamAV configuration file.
|
||
|
||
sudo nano /etc/clamav/clamd.conf
|
||
|
||
Find the following line:
|
||
|
||
MaxDirectoryRecursion 15
|
||
|
||
The default maximum depth directories scanned by ClamAV is 15, you probably want to change it to a bigger number to avoid the “directory recursion limit reached” warning.
|
||
|
||
MaxDirectoryRecursion 30
|
||
|
||
Then find the following two lines.
|
||
|
||
MaxScanSize 100M
|
||
MaxFileSize 25M
|
||
|
||
The default max scan size is 100M and the max file size is 25M. It’s likely that your server has files of more than 100M. The default config will produce the following errors when the file size exceeds the limit.
|
||
|
||
LibClamAV Warning: PNG: Unexpected early end-of-file.
|
||
LibClamAV Warning: cli\_scanxz: decompress file size exceeds limits - only scanning 27262976 bytes
|
||
|
||
You can increase the scan size like:
|
||
|
||
MaxScanSize 2048M
|
||
MaxFileSize 2048M
|
||
|
||
Linux has many special files in `/proc/`, `/sys/`, `/run/`, `/dev/`, `/snap/` and `/var/lib/lxcfs/cgroup/` directory that should not be scanned, so you need to exclude them in ClamAV by adding the following lines at the end of this file.
|
||
|
||
ExcludePath ^/proc
|
||
ExcludePath ^/sys
|
||
ExcludePath ^/run
|
||
ExcludePath ^/dev
|
||
ExcludePath ^/snap
|
||
ExcludePath ^/var/lib/lxcfs/cgroup
|
||
|
||
Save and close the file. Then restart `clamav-daemon.service` for the changes to take effect.
|
||
|
||
sudo systemctl restart clamav-daemon
|
||
|
||
Wait a few seconds for `clamav-daemon.service` to finish restarting. Next, you can start scanning with:
|
||
|
||
sudo clamdscan --fdpass /
|
||
|
||
This will scan the entire Linux file system, excluding the directories we mentioned earlier. To make ClamAV scan the file sytem automatically, edit the root user’s crontab file.
|
||
|
||
sudo crontab -e
|
||
|
||
Add the following line to this file. ClamAV will scan the entire file system at 5:10AM every day.
|
||
|
||
10 5 \* \* \* /usr/bin/clamdscan --fdpass /
|
||
|
||
Save and close the file.
|
||
|
||
**Hint #1**: There’s another utility called `clamscan` that can also be used for virus scanning. However, `clamscan` doesn’t use the virus definition database that’s already loaded in memory. It will load a separate copy of virus definition database into memory again, wasting server resources.`clamscan` is also slower than `clamdscan`, so I don’t recommend it.
|
||
|
||
**Hint #2**: If there are a huge number of files on your server, `clamdscan` will use lots of CPU resources.
|
||
|
||
## Wrapping Up
|
||
|
||
I hope this tutorial helped you set up Amavis and ClamAV on Ubuntu mail server. As always, if you found this post useful, then [subscribe to our free newsletter](https://newsletter.linuxbabe.com/subscription/wkeY5d6pg) to get more tips and tricks. Take care 🙂 |