
410 lines
14 KiB
Markdown
410 lines
14 KiB
Markdown
---
|
||
page-title: "Using Let's Encrypt for internal servers - Philipp's Tech Blog"
|
||
url: https://blog.heckel.io/2018/08/05/issuing-lets-encrypt-certificates-for-65000-internal-servers/
|
||
date: "2023-04-06 08:52:23"
|
||
---
|
||

|
||
|
||
[Let’s Encrypt](https://letsencrypt.org/) is a revolutionary new certificate authority that provides free certificates in a completely automated process. These certificates are issued via the [ACME protocol](https://ietf-wg-acme.github.io/acme/draft-ietf-acme-acme.html). Over the last 2 years or so, the Internet has widely adopted Let’s Encrypt — over 50% of the web’s SSL/TLS certificates are now issued by Let’s Encrypt.
|
||
|
||
But while there are many tools to automatically renew certificates for publicly available webservers ([certbot](https://certbot.eff.org/), [simp\_le](https://github.com/kuba/simp_le), [I wrote about how to do that 3 years back](https://blog.heckel.xyz/2015/12/04/lets-encrypt-5-min-guide-to-set-up-cronjob-based-certificate-renewal/)), it’s hard to find any useful information about how to issue certificates for internal non Internet facing servers and/or devices with Let’s Encrypt.
|
||
|
||
This blog posts describes **how to issue Let’s Encrypt certificates for internal servers**. At my work, we issued a certificate for each of our 65,000 90,000+ BCDR appliances using this exact mechanism.
|
||
|
||
---
|
||
|
||
**Content**
|
||
|
||
1. [1\. How does it work?](https://blog.heckel.io/2018/08/05/issuing-lets-encrypt-certificates-for-65000-internal-servers/#How-does-it-work)
|
||
2. [2\. Example: An internal server 10.1.1.4, aka. xi8qz.example.com](https://blog.heckel.io/2018/08/05/issuing-lets-encrypt-certificates-for-65000-internal-servers/#Example-An-internal-server-10-1-1-4-aka-xi8qz-example-com)
|
||
1. [2.1. Prerequisites: Assigning a domain for each machine (steps 1-3)](https://blog.heckel.io/2018/08/05/issuing-lets-encrypt-certificates-for-65000-internal-servers/#Prerequisites-Assigning-a-domain-for-each-machine-steps-1-3)
|
||
2. [2.2. Requesting a certificate (steps 4-14)](https://blog.heckel.io/2018/08/05/issuing-lets-encrypt-certificates-for-65000-internal-servers/#Requesting-a-certificate-steps-4-14)
|
||
3. [3\. Deployment considerations: Let’s Encrypt rate limits](https://blog.heckel.io/2018/08/05/issuing-lets-encrypt-certificates-for-65000-internal-servers/#Deployment-considerations-Let-s-Encrypt-rate-limits)
|
||
|
||
---
|
||
|
||
**Hello Hacker News,** first time on the HN front page! I feel honored, yeyy! I responded to all of the concerns in the [comments section](https://news.ycombinator.com/item?id=19353294).
|
||
|
||
**If you’re looking for an implementation of this idea,** you may find [localtls](https://github.com/Corollarium/localtls) interesting. I have not tested it myself, but it seems to do similar things to what I am describing here.
|
||
|
||
---
|
||
|
||
### 1\. How does it work? [¶](https://blog.heckel.io/2018/08/05/issuing-lets-encrypt-certificates-for-65000-internal-servers/#How-does-it-work)
|
||
|
||
To issue a certificate through Let’s Encrypt, you must prove that you either own the website you want to issue the certificate for, or that you own the domain it runs on. Typically, automated tools like [certbot](https://certbot.eff.org/) use the [HTTP challenge](https://ietf-wg-acme.github.io/acme/draft-ietf-acme-acme.html#rfc.section.8.3) to prove site ownership using the .well-known directory. While this works beautifully if the site is Internet-facing (and Let’s Encrypt can verify the HTTP challenge files via a simple HTTP request), it doesn’t work if your server runs on 10.1.1.4 or any other internal address.
|
||
|
||
The [DNS challenge](https://ietf-wg-acme.github.io/acme/draft-ietf-acme-acme.html#rfc.section.8.4) solves this problem by letting you prove domain ownership through the DNS TXT record \_acme-challenge.example.com. Let’s Encrypt will verify that the record matches what it expects and issue your certificate if it all adds up.
|
||
|
||
So really the magic ingredients to issuing certificates for internal non Internet facing machines are:
|
||
|
||
- A dedicated DNS zone for all your internal devices, e.g. xi8qz.example.com, and a dynamic DNS server to manage this zone (here: example.com)
|
||
- An ACME client capable of using the Let’s Encrypt’s DNS challenge to prove domain ownership
|
||
|
||
Advertisement
|
||
|
||
### 2\. Example: An internal server 10.1.1.4, aka. xi8qz.example.com [¶](https://blog.heckel.io/2018/08/05/issuing-lets-encrypt-certificates-for-65000-internal-servers/#Example-An-internal-server-10-1-1-4-aka-xi8qz-example-com)
|
||
|
||
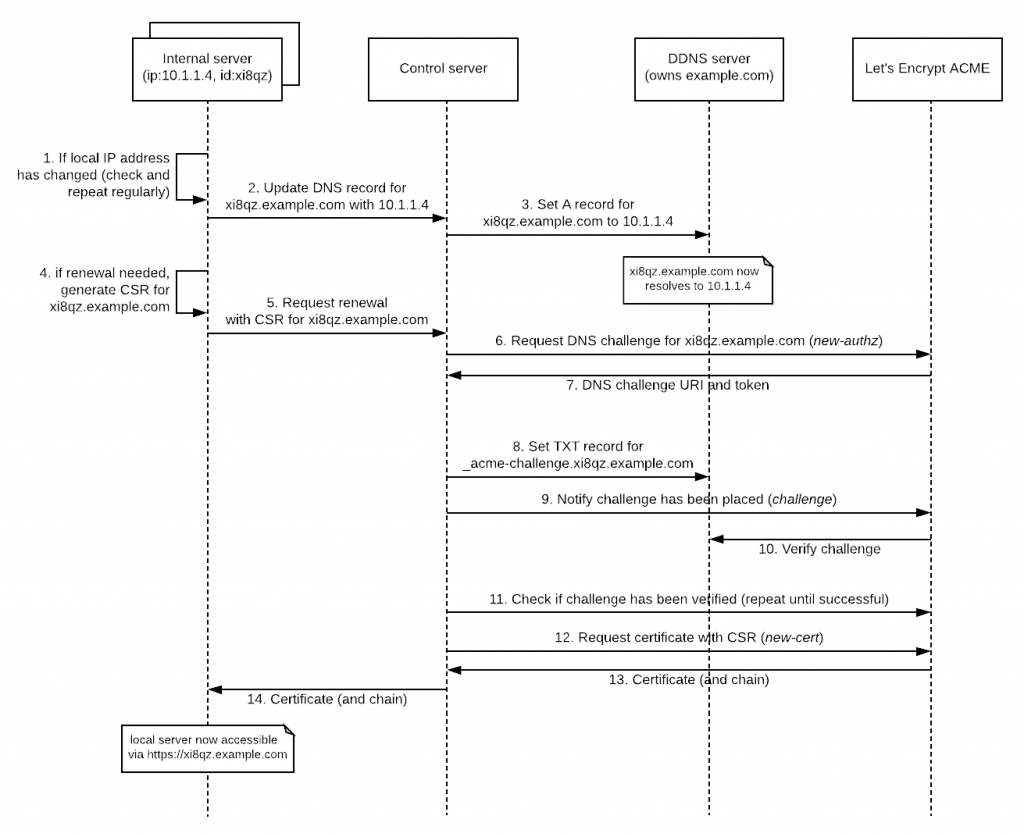
The following diagram shows how we have implemented our Let’s Encrypt integration for our backup appliances. Each appliance (read: internal server) is behind a NAT and carries its own local IP address.
|
||
|
||
The general approach is simple: The appliance regularly reaches out to our control server to ensure that it can be reached via its own subdomain. If its local IP address changes, it triggers an update of its own subdomain. In addition, it checks regularly if the certificate is still valid, and requests a renewal if it’s outdated.
|
||
|
||
Here’s a bit more detail to this process:
|
||
|
||
|
||
|
||
For this example, let’s assume we’re trying to issue a certificate for an appliance with the identifier xi8qz and the local IP address 10.1.1.4. From the perspective of this appliance, there are two requests to be made:
|
||
|
||
- **Steps 1-3:** First, it needs to set/update its own DNS domain (here: xi8qz.example.com). This domain will later be used as a common name (CN) in the certificate. On top of that, it needs to make sure that this record is updated every time the server’s IP address changes.
|
||
- **Steps 4-14:** It needs to regularly check if the local certificate needs to be renewed and request a renewal if it’s time. Obviously, if there is no certificate it needs to be “renewed”.
|
||
|
||
Let’s now examine these steps in greater detail.
|
||
|
||
#### 2.1. Prerequisites: Assigning a domain for each machine (steps 1-3) [¶](https://blog.heckel.io/2018/08/05/issuing-lets-encrypt-certificates-for-65000-internal-servers/#Prerequisites-Assigning-a-domain-for-each-machine-steps-1-3)
|
||
|
||
As mentioned above, we need to give each appliance a proper domain name in order to be able to prove ownership to Let’s Encrypt, so we need to buy a domain (here: example.com) and delegate its NS records to our DDNS server:
|
||
|
||
$ dig +short NS example.com
|
||
|
||
ddns1.mycompany.com.
|
||
|
||
On top of that, we need the ability to dynamically add and remove records from it (via an API of some sort). I’ve previously written about how to [spin up your own DDNS server](https://blog.heckel.xyz/2016/12/31/your-own-dynamic-dns-server-powerdns-mysql/), if you are interested.
|
||
|
||
Once that’s all set up, we need to make sure that the machine’s A record is updated whenever its IP address changes. For our internal machine, let’s assign xi8qz.example.com as its domain. If everything’s working properly, you should be able to resolve this domain to its IP address using a normal DNS query:
|
||
|
||
$ dig +short xi8qz.example.com
|
||
|
||
10.1.1.4
|
||
|
||
#### 2.2. Requesting a certificate (steps 4-14) [¶](https://blog.heckel.io/2018/08/05/issuing-lets-encrypt-certificates-for-65000-internal-servers/#Requesting-a-certificate-steps-4-14)
|
||
|
||
Assuming you now control the DNS zone for example.com completely and you can quickly edit it dynamically, you’re all set for actually issuing certificates for your local device domain via Let’s Encrypt.
|
||
|
||
For our example appliance, it will regularly check if the existing certificate is still valid (step 4). If there is no certificate or the existing one is about to expire, the device will generate a keypair and a [certificate signing request (CSR)](https://en.wikipedia.org/wiki/Certificate_signing_request) using its assigned hostname (here: xi8qz.example.com) as a CN, and it’ll send that CSR to the control server (step 5).
|
||
|
||
After authorizing the request (an important step not shown in the diagram!), the control server requests a DNS challenge for the given domain from the ACME API via the [Pre-Authorization](https://ietf-wg-acme.github.io/acme/draft-ietf-acme-acme.html#rfc.section.7.4.1)/new-authz API call (step 6). The ACME API responds with a DNS challenge (step 7). If all goes well, this looks something like this:
|
||
|
||
1
|
||
|
||
2
|
||
|
||
3
|
||
|
||
4
|
||
|
||
5
|
||
|
||
6
|
||
|
||
7
|
||
|
||
8
|
||
|
||
9
|
||
|
||
10
|
||
|
||
11
|
||
|
||
12
|
||
|
||
13
|
||
|
||
14
|
||
|
||
15
|
||
|
||
16
|
||
|
||
17
|
||
|
||
18
|
||
|
||
{
|
||
|
||
"identifier": {
|
||
|
||
"type": "dns",
|
||
|
||
"value": "xi8qz.example.com"
|
||
|
||
},
|
||
|
||
"status": "pending",
|
||
|
||
"expires": "2018-04-15T21:26:29Z",
|
||
|
||
"challenges": \[
|
||
|
||
{
|
||
|
||
"type": "dns-01",
|
||
|
||
"status": "pending",
|
||
|
||
"uri": "https://acme-staging.api.letsencrypt.org/acme/challenge/VtjihR4X8nLAj4MDwI...",
|
||
|
||
"token": "aLptEKAeUOajkiGrx-kkbjUX4b1MC..."
|
||
|
||
},
|
||
|
||
// ...
|
||
|
||
\],
|
||
|
||
// ...
|
||
|
||
}
|
||
|
||
Using this response, the control server must set a DNS TXT record at \_acme-challenge.xi8qz.example.com (step 8) and notify the ACME API that the challenge response has been placed (step 9).
|
||
|
||
Once the challenge response has been verified by Let’s Encrypt (step 10-11), the certificate can finally be requested using the CSR (step 12-13).
|
||
|
||
After Let’s Encrypt responds with a certificate, you’ll see something like this on the wire:
|
||
|
||
\--\--\-BEGIN CERTIFICATE\--\--\-
|
||
|
||
MIIGEjCCBPqgAwIBAgISAyk2izMz7OXSqHeZhg+rUR5uMA0GCSqGSIb3DQEBCwUA
|
||
|
||
MEoxCzAJBgNVBAYTAlVTMRYwFAYDVQQKEw1MZXQncyBFbmNyeXB0MSMwIQYDVQQD
|
||
|
||
...
|
||
|
||
If decoded with openssl, we can see that’s it’s the real deal:
|
||
|
||
1
|
||
|
||
2
|
||
|
||
3
|
||
|
||
4
|
||
|
||
5
|
||
|
||
6
|
||
|
||
7
|
||
|
||
8
|
||
|
||
9
|
||
|
||
10
|
||
|
||
11
|
||
|
||
12
|
||
|
||
13
|
||
|
||
14
|
||
|
||
15
|
||
|
||
16
|
||
|
||
17
|
||
|
||
18
|
||
|
||
19
|
||
|
||
$ openssl x509 \-in www.crt \-text \-noout
|
||
|
||
Certificate:
|
||
|
||
Data:
|
||
|
||
Version: 3 (0x2)
|
||
|
||
Serial Number:
|
||
|
||
03:29:36:8b:33:33:ec:e5:d2:a8:77:99:86:0f:ab:51:1e:6e
|
||
|
||
Signature Algorithm: sha256WithRSAEncryption
|
||
|
||
Issuer: C\=US, O\=Let's Encrypt, CN=Let's Encrypt Authority X3
|
||
|
||
Validity
|
||
|
||
Not Before: Jul 18 23:37:35 2018 GMT
|
||
|
||
Not After : Oct 16 23:37:35 2018 GMT
|
||
|
||
Subject: CN\=xi8qz.example.com
|
||
|
||
Subject Public Key Info:
|
||
|
||
Public Key Algorithm: rsaEncryption
|
||
|
||
Public\-Key: (2048 bit)
|
||
|
||
Modulus:
|
||
|
||
00:be:69:df:28:04:9c:2b:e9:94:72:c3:de:a6:fd:
|
||
|
||
a4:38:93:be:43:a7:81:8b:dc:9a:be:19:0d:c0:d1:
|
||
|
||
...
|
||
|
||
This certificate is then returned to the machine (step 14). After the webserver of the appliance/server has been restarted, it’s web interface can be accessed via HTTPS in the browser or on the command line:
|
||
|
||
1
|
||
|
||
2
|
||
|
||
3
|
||
|
||
4
|
||
|
||
5
|
||
|
||
6
|
||
|
||
7
|
||
|
||
8
|
||
|
||
9
|
||
|
||
10
|
||
|
||
11
|
||
|
||
12
|
||
|
||
13
|
||
|
||
14
|
||
|
||
15
|
||
|
||
16
|
||
|
||
17
|
||
|
||
18
|
||
|
||
19
|
||
|
||
20
|
||
|
||
21
|
||
|
||
22
|
||
|
||
23
|
||
|
||
24
|
||
|
||
25
|
||
|
||
26
|
||
|
||
27
|
||
|
||
28
|
||
|
||
29
|
||
|
||
30
|
||
|
||
31
|
||
|
||
32
|
||
|
||
33
|
||
|
||
34
|
||
|
||
35
|
||
|
||
36
|
||
|
||
$ curl \-v https://xi8qz.example.com/login
|
||
|
||
\* Trying 10.1.1.4...
|
||
|
||
\* TCP\_NODELAY set
|
||
|
||
\* Connected to xi8qz.example.com (10.1.1.4) port 443 (#0)
|
||
|
||
\* ALPN, offering h2
|
||
|
||
\* ALPN, offering http/1.1
|
||
|
||
\* successfully set certificate verify locations:
|
||
|
||
\* CAfile: /etc/ssl/certs/ca\-certificates.crt
|
||
|
||
CApath: /etc/ssl/certs
|
||
|
||
\* TLSv1.2 (OUT), TLS handshake, Client hello (1):
|
||
|
||
\* TLSv1.2 (IN), TLS handshake, Server hello (2):
|
||
|
||
\* TLSv1.2 (IN), TLS handshake, Certificate (11):
|
||
|
||
\* TLSv1.2 (IN), TLS handshake, Server key exchange (12):
|
||
|
||
\* TLSv1.2 (IN), TLS handshake, Server finished (14):
|
||
|
||
\* TLSv1.2 (OUT), TLS handshake, Client key exchange (16):
|
||
|
||
\* TLSv1.2 (OUT), TLS change cipher, Client hello (1):
|
||
|
||
\* TLSv1.2 (OUT), TLS handshake, Finished (20):
|
||
|
||
\* TLSv1.2 (IN), TLS handshake, Finished (20):
|
||
|
||
\* SSL connection using TLSv1.2 / ECDHE\-RSA\-AES256\-GCM\-SHA384
|
||
|
||
\* ALPN, server accepted to use http/1.1
|
||
|
||
\* Server certificate:
|
||
|
||
\* subject: CN\=xi8qz.example.com
|
||
|
||
\* start date: Jul 18 23:37:35 2018 GMT
|
||
|
||
\* expire date: Oct 16 23:37:35 2018 GMT
|
||
|
||
\* subjectAltName: host "xi8qz.example.com" matched cert's "xi8qz.example.com"
|
||
|
||
\* issuer: C=US; O=Let's Encrypt; CN\=Let's Encrypt Authority X3
|
||
|
||
\* SSL certificate verify ok.
|
||
|
||
\> GET /login HTTP/1.1
|
||
|
||
\> Host: xi8qz.example.com
|
||
|
||
\> User\-Agent: curl/7.58.0
|
||
|
||
\> Accept: \*/\*
|
||
|
||
\>
|
||
|
||
< HTTP/1.1 200 OK
|
||
|
||
< Date: Sun, 05 Aug 2018 17:38:49 GMT
|
||
|
||
< Server: Apache/2.4.18 (Ubuntu)
|
||
|
||
...
|
||
|
||
### 3\. Deployment considerations: Let’s Encrypt rate limits [¶](https://blog.heckel.io/2018/08/05/issuing-lets-encrypt-certificates-for-65000-internal-servers/#Deployment-considerations-Let-s-Encrypt-rate-limits)
|
||
|
||
It’s important to note that if you are considering implementing this mechanism for a large number of servers that you use the Let’s Encrypt [staging environments](https://letsencrypt.org/docs/staging-environment/) for testing and, more importantly, that you consider their [rate limit restrictions](https://letsencrypt.org/docs/rate-limits/).
|
||
|
||
By default, Let’s Encrypt only allows you to issue 20 certificates per week for the same domain or the same account. To increase this number, you have to either [request a higher rate limit](https://goo.gl/forms/plqRgFVnZbdGhE9n1) or get your domain added to the [public suffix list](https://publicsuffix.org/) (note: adding your domain here has other implications!).
|
||
|
||
Due to these rate limits, it is vital that you spread out the initial deployment enough to stay under the rate limit, and that you leave enough room for future servers to be added. Also consider renewals in the initial rollout plan.
|
||
|
||
### 4\. Summary
|
||
|
||
As you can see it’s not really rocket science.
|
||
|
||
We first assigned each appliance (aka. internal server) a public domain name using our own dynamic DNS server and a dedicated DNS zone. Using the server’s assigned domain (here: xi8qz.example.com), we then used Let’s Encrypt’s free certificate offering and their DNS challenge to issue a certificate for that server.
|
||
|
||
By doing that for all internal servers, we can provide secure communication in our internal IT infrastructure without having to deploy a custom CA cert or having to pay for certificates. |